Mix Veggie Aloo Tikki Chaat

Aloo tiki chaat is pretty famous as street food in North India. As the winters approach the stall for tikki chaat increases on the street. Regular Aloo Tikki, I have already discussed in Veg Burger recipe. I have made little variations here by using few seasonal veggies like cabbage, cauliflower, beans and peas. This makes the tikki nutritious and more tasty.

This tongue tickling chaat includes chana daal stuffed mix veggie spicy tikki with tangy tamarind and coriander mint chutney. I have shallow fried the tikkis, if desired you can deep fry for more crispness.

DSC_0381

So friends, give your taste buds a delighfull taste with this chaat,

Ingredients:       

FOR TIKKI:

Potato (Boiled) – 4 medium

Cabbage (Grated) – ½ cup

Cauliflower (Grated) – ½ cup

Beans (Chopped) – 5-6 strands

Green Peas (Boiled) – ¼ cup

Green chilli (Chopped) – 2 nos.

Onion (Chopped) – 1 medium

Whole Wheat Bread Slices – 2 nos

Corn Flour – 2 tsp

Salt – to taste

Red Chilli Powder – 1 tsp

Dry Mango Powder – ½ tsp

DSC_0384

FOR STUFFING:

 Channa Daal (Soaked and boiled) – ¼ cup

Salt – to taste

Red Chilli Powder – ¼ tsp

Dry Mango Powder – ¼ tsp


FOR CHAAT:

Green Chutney

Tamarind Chutney

Beaten Curd

Chopped Onion

Chaat Masala

Chopped Coriander

Plain Sev

DSC_0382

METHOD:

  1. Soak channa daal in water for 2 hours. Drain water add salt and 3/4 cup water and pressure-cook it for 2 whistles over medium flame. Transfer cooked channa daal to a colander and remove excess water. Cooked chana dal should be whole and separated from each other. Let it cool. Add dry mango powder, salt and red chilli powder.
  2. Take boiled potatoes in a large bowl. Add grated cabbage and cauliflower, boiled peas, chopped beans, chopped onion, chopped green chilli, corn flour, and salt in it and mix well.
  3. Take a bowl with water, dip the bread slices to it and immediately squeeze excess water.
  4. Add wet and crushed bread, red chilli powder, dry mango powder to the potato mixture. Mix it well.
  5. Divide prepared mixture into 12 equal portions. Give each portion a round shape of ball and press a little to make a thick tikki. Put 1teaspoons filling in the center of the tikki. Wrap filling from all sides and make round ball. Again press a little and flatten stuffed ball into a tikki. Repeat the process for remaining portions.
  6. Heat a non stick pan and drizzle some oil to it. Place 4 tikkis and cook for few minutes each side. Cook until each side turns brown and crisp.
  7. Transfer it to a plate. Repeat steps for remaining tikkis. Stuffed mix veggie aloo tikkis for chaats are ready.

DSC_0387

SERVING:

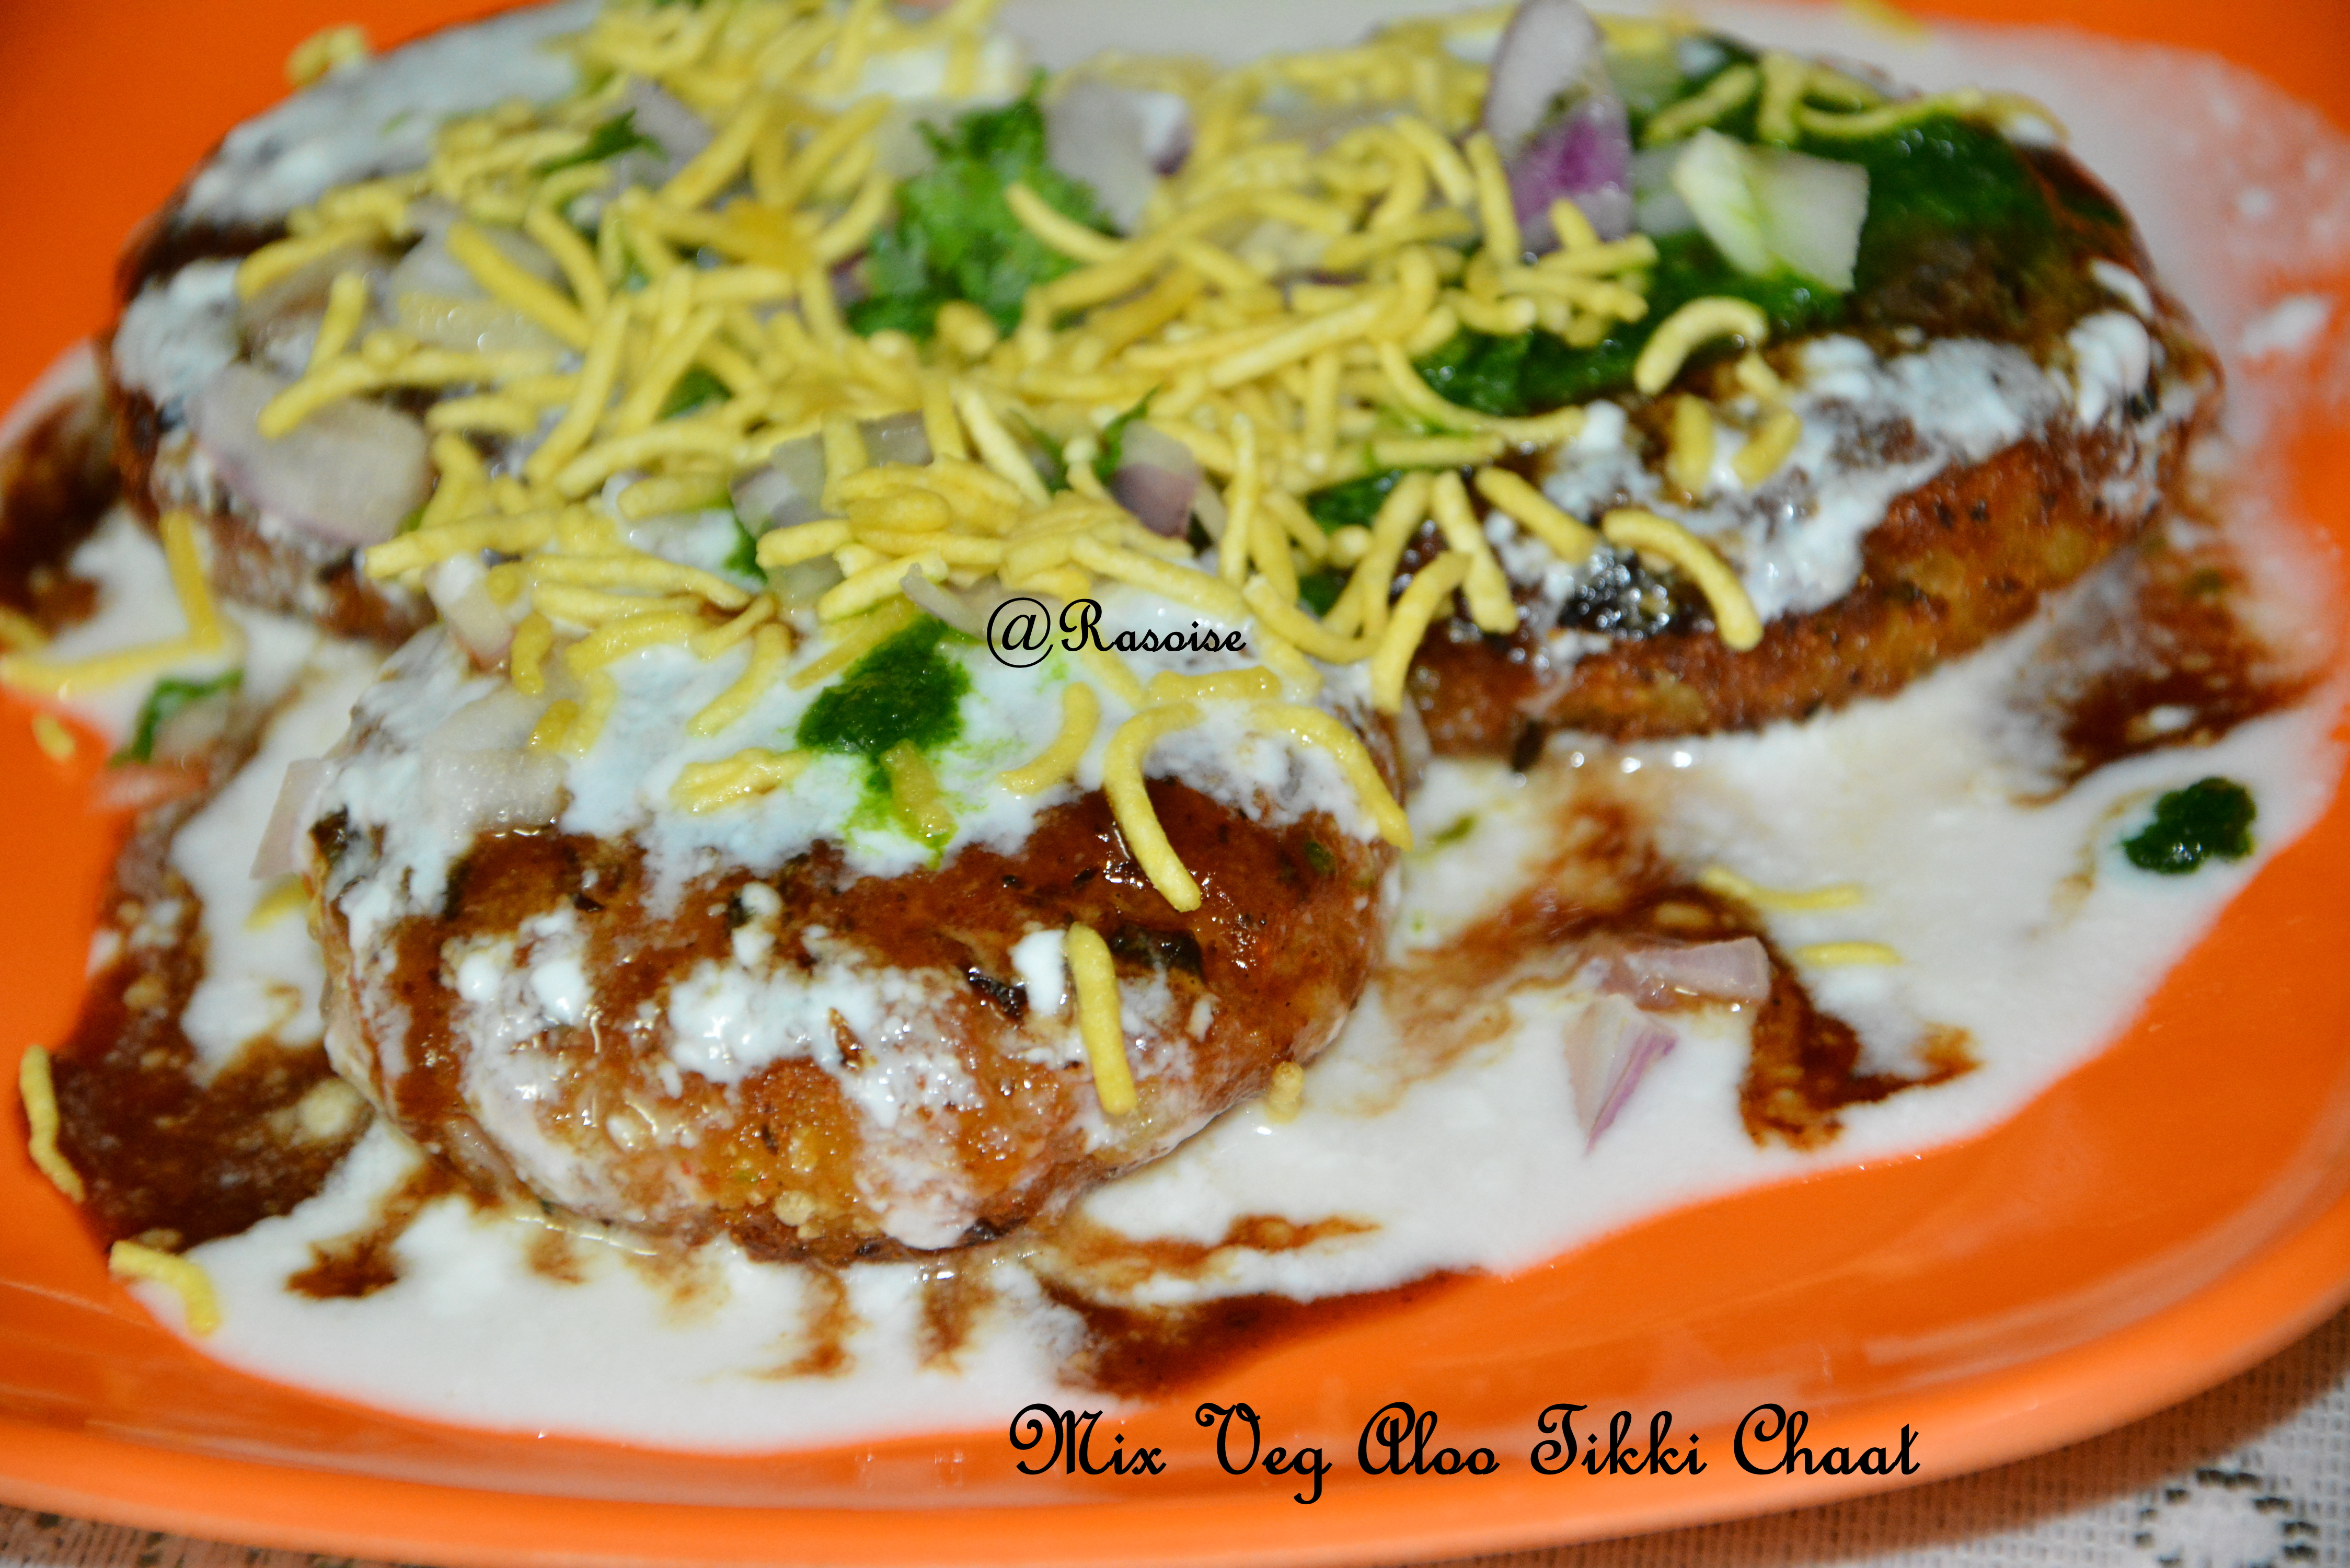
  1. Take 3 aloo tikkis in a serving plate. Top each tikki with 2 teaspoon of beaten curd, followed by 1 teaspoon green chutney, 2 teaspoons date-tamarind chutney. Sprinkle some chaat masala.
  2. Garnish with chopped onion, chopped coriander leaves and sev.
  3. Prepare remaining serving plates and serve immediately.

If you like our recipe leave a comment below. We would like to know your experiences as well. Or you can  follow us at Facebook, Twitter and Pinterest


Paneer Bhurjii

Paneer, as I always say is important in our diet. We should try that we can eat paneer atleast once a week. When I have enough time in hand, paneer butter masala, or matar paneer or paneer tortilla wraps is my choice. However when time is less and something delicious and quick is to be made then Paneer Bhurjii, Chilli Paneer is the choice.

This paneer bhurjii is nutritious as it contains veggies like capsicum and carrot. The amount of veggies can be altered as per the taste required. You can also add some peas to enrich the flavor. I have used kitchen king masala, which can be replaced by pav bhaji masala as well.

Here I come with very simple yet delicious recipe of paneer….

DSC_0335

Ingredients:

Paneer (Crumbled) – 250gms

Onion (chopped) – 1 medium

Tomato (Chopped) – 1 medium

Capsicum (chopped) – 1 small

Carrot (finely chopped – 1 small

Green Chillies (chopped) – 2nos.

Ginger Garlic paste – ¼ tsp

Salt – to taste

Red Chilli Powder – ½ tsp

Kitchen King Masala – 1tsp

Turmeric powder – ¼ tsp

Coriander Powder – 1 tsp

Coriander – few chopped

DSC_0331


Method:

  • Heat oil in a kadai and add onions and green chillies and fry until the onions turns transparent.
  • Add ginger-garlic paste and sauté.
  • Add capsicum and carrot. Saute till half cooked.
  • Add tomatoes and saute until it becomes slightly mushy.
  • Now add all the masalas. Saute for a while.
  • Add crumbled paneer and salt and saute for few minutes. The mixture should be moist and not dry.
  • Garnish with chopped coriander and lemon.

Serve it hot with Roasted Butter Pao , Toasted Butter Bread or with Plain Roti, Naans.

If you like our recipe leave a comment below. We would like to know your experiences as well. Or you can  follow us at Facebook, Twitter and Pinterest

DIY – Homemade Tomato Ketchup / Tomato Sauce

These days tomatoes are really cheap in the market and vegetable sellers are flooded with tomatoes. This is the ideal time to make tomato ketchup / sauce. You can preserve this homemade for almost a year. It contains a preservative, sodium benzoate, which increases its shelf life.This homemade ketchup is made of tomatoes and only tomatoes. You can serve Springrolls, Kachori, Dhokla, Sandwich, Kothimbir Vadi, Burger and many other snacks.

Here we go,

Ingredients:

Tomatoes – 2 kg

Green Chillies – 5-6 (cut into pieces)

Garlic – 8-10 cloves

Cloves (Laung) – 3-4

Sugar – ½ cup

Salt – to taste

Black Pepper – ½ tsp

Sodium Benzoate – ¼ tsp

Image

Method:

  1. Rinse the tomatoes under running water and cut each tomato into four parts.
  2. Cut green chillies and garlic into pieces.
  3. Take a pressure cooker and add tomatoes, green chilli, garlic and cloves.
  4. Pressure cook to two whistles.
  5. Let it cool.
  6. Blend the tomato mixture to a smooth puree and strain it through a strainer to a heavy bottom wok.
  7. Keep the wok on a stove top. Add sugar, salt and black pepper.
  8. Stir continuously on a medium flame till the pulp starts thickening and reaches ketchup like consistency. The pulp should fall from the spoon in lumps. It should not fall free flow.
  9. Remove from the flame and allow it to cool.
  10. Add sodium benzoate to the sauce and mix well.
  11. Store it in a sterilized jar.

If you like our recipe leave a comment below. We would like to know your experiences as well. Or you can  follow us at Facebook, Twitter and Pinterest


Soft Idli / How to make soft Idli

Idli is one of my favorite dish from South Indian cuisine. The most important aspect of idli is its softness. The Idlis made this Sunday turned out very soft and fluffy. To make Idli soft, batter plays an important role. Idli can be served with Sambhar and Chutney. For morning breakfast, it can be served with chutney as well.

Check dosa batter and dosa making recipe here. You can also try Idli in microwave.

2

Here we go,

Ingredients:

  • Par Boiled Rice – 1 cup (Soaked for 5hours)
  • Rice – 1 cup (Soaked for 5hours)
  • Urad Dal (without skin) – ½ cup (Soaked for 5hours)
  • Poha – ¼ cup
  • Fenugreek Seeds – ½ tsp (Soaked for 5hours)
  • Salt – to taste
  • Oil – to grease

DSC_0563

Method:

  1. If you wish to make Idli on Sunday, process should start on Saturday. Soak par boiled rice, poha and rice together for at least five hours.
  2. Simultaneously, in another bowl soak urad dal and fenugreek seeds together for at least five hours.
  3. Grind the soaked rice into fine and fluffy paste adding some water. I used almost one cup water while grinding.
  4. Grind the soaked Urad Dal and fenugreek seeds into a fine and fluffy paste. Less water is required while grinding the dal. Total grinding of rice and dal took more than half hour.
  5. Mix both the batter and mix well. Add salt.
  6. Cover the batter and let it ferment for 10hours or overnight. After fermentation the batter will rise to double and bubble will appear on the batter.
  7. Grease the idli moulds. Pour the batter in the moulds, steam the idlis in a steamer.
  8. Steam for 10-12 mins or until the idlis are done. Insert a toothpick to check, if t comes out clean, its done.

1.1

If you like our recipe leave a comment below. We would like to know your experiences as well. Or you can  follow us at Facebook, Twitter and Pinterest


Vegetable Noodle Spring Roll

Spring Roll is an indo – Chinese recipe. It is crunchy mix vegetables and noodles rolled and deep fried in in all purpose flour wrappers. It crispy, crunchy, spicy snack wich can be served with Chinese sauces or simple tomato sauce. The wrappers used in spring roll are available in leading departmental stores. However I have made wrappers at home. Instead of deep frying the rolls, I have shallow fried. You can use any veggies of your choice.

You may also like, Manchurian and Fried rice.

1

The process is divided into three steps:

  1. Making of wrappers
  2. Cooking Veggies and noodles
  3. Assembly of the roll

Let’s start,

Ingredients for wrappers:

  • All purpose flour – 1 cup
  • Water – 1 cup
  • Salt – to taste

Method:

  1. In a big bowl combine the plain flour, water and salt, and whisk well until well combined and there are no lumps. The batter should be of flowing consistency.
  2. Heat and grease a nonstick pan with oil. Once the pan is hot, with heat on medium, pour a ladle of the batter into the pan spread around quickly(like we do for dosa) to make a thin circle.
  3. Cook on medium heat until you see the sides are peeling. When the sides begin to peel off, turn the wrapper and cook on the other side for a few seconds.
  4. Repeat with the remaining batter to make more wrappers.

2

Ingredients for Veggies and noodles:

  • Cabbage – ½ cup shredded
  • Carrot – 1 nos (thinely sliced)
  • Capsicum – ½ nos (finely chopped)
  • Onion – 1 nos (finely chopped)
  • Noodles – ½ cup (boiled)
  • Black pepper – 1tsp
  • Salt – to taste
  • Soya sauce – 2 tsp
  • Chilli sauce – 1 tsp
  • Oil

Method:

  1. Heat a tablespoon of oil in a wok on high heat. Add in the cabbage, carrots, onions, capsicum.. Saute the vegetables on high heat. Do not overcook, the veggies should be crunchy.
  2. Stir in the salt and black pepper. Add sauces and noodles. Saute for a minute and transfer to a another bowl. Allow the mixture to cool completely.

3

Assembly of the roll:

  1. Place each square spring roll wrapper on a flat surface. Apply a little flour paste along the edges of the wrapper. Place a tablespoon of the filling on one corner/edge of the wrapper.
  2. Fold in from the filled corner and begin rolling until you reach the center. When you reach the center, fold the ends arising from the sides of the wrapper. And roll till the end.Make sure the edges are sealed well. The flour paste is important as it helps to seal the spring rolls so they don’t open up when deep fried.
  3. Repeat the process and make the rest of the spring rolls.
  4. Heat the oil in a heavy bottom wok and add in a few rolls at a time and deep fry on medium heat until golden brown in color.

Serve the spring rolls with homemade tomato sauce.

If you like our recipe leave a comment below. We would like to know your experiences as well. Or you can  follow us at Facebook, Twitter and Pinterest


Idli in Microwave

Usually, I make Idli in Idli steamer. This time, I tried making in microwave friendly idli moulds. The result was little fluffy, but definitely soft idlis.

Here we go,

Image

Ingredients:

Idli Batter – 4 big spoon

Salt – to taste

Oil for greasing

Image

Method:

  1. Beat the batter. The batter should be of pouring consistency.
  2. Add salt.
  3. Take the Microwave friendly Idli mould and apply oil in the idly dents.
  4. Fill the Idly dents with batter and Pour half glass water into the Idli steamer pot.
  5. Microwave for five minutes.
  6. Idli is ready.

If you like our recipe leave a comment below. We would like to know your experiences as well. Or you can  follow us at Facebook, Twitter and Pinterest

Paneer Butter Masala

Paneer is a must ingredient in our diet atleast once a week. Last week I tried Paneer Salsa Tortilla Wrap, and this week it was Paneer Butter Masala. I have also posted before Peas Paneer akka Matar Paneer. Paneer Butter Masala is generally served with tandoori roti / Naan / Garlic Naan / Onion Kulcha in most of the restaurants. I love it with garlic naan. Paneer Butter Masala is paneer pieces dipped in onion tomato gravy flavored in butter. It’s a must try recipe.

Image

Here we go,

Ingredients:

  • Paneer – 250gms (Cut into cubes)
  • Onion – 2 big (Coarsely grinded)
  • Tomato – 2 big (grinded to puree)
  • Garlic – 5-6 flakes (finely chopped)
  • Cashew Nuts – 10 nos. (grinded with milk)
  • Green Chillies – 2 nos. (finely chopped)
  • Fresh cream – ¼ cup
  • Milk – ½ cup
  • Red Chilli Powder – 1tsp
  • Coriander Powder – 1 tsp
  • Jeera Powder – ½ tsp
  • Garam Masala – ½ tsp
  • Turmeric Powder – ¼ tsp
  • Sugar – ½ tsp
  • Kasuri Methi – 1 tsp
  • Butter – 4 tsp
  • Coriander Leaves – few chopped for garmish

Image

Method:

  1. Cut paneer into big cubes.
  2. Soak cashew nuts in warm milk for some time. Grind it to a smooth paste.
  3. Grind chopped onions with ginger garlic paste to a slightly coarse or smooth paste.
  4. Heat oil and add 2 tbsp butter and add green chilli, onion, garlic paste mixture and saute until it turns light brown and the raw smell goes.
  5. Add tomato puree and saute until the mixture becomes really thick and oil separates from the mixture. Saute the tomato mixture until it leaves the pan and make sure masala is not burning at any stage.Image
  6. Add roasted cumin powder, sugar, salt, coriander powder, red chili powder and turmeric powder and mix well.
  7. Add milk and boil it for approx ten minutes or till the oil separates and the gravy dries to make thick masala gravy.
  8. Now add the ground cashewnut- milk mixture and fresh cream. Add kasuri methi and garam masala.
  9. Add remaining butter and paneer pieces and give it a stir. Garnish with coriander leaves.

Image

Serve hot with Naan, Kulcha or parantha!!

If you like our recipe leave a comment below. We would like to know your experiences as well. Or you can  follow us at Facebook, Twitter and Pinterest

Chicken Gravy for Biryani


Biryani taste even more delicious with a side gravy which brings its own unique taste. Every restaurant serves biryani with dahi raita and this side gravy dish in a small bowl. The quantity is so small that we end up using it as a chutney/spread with biryani. The home made gravy is an easy and close to restaurant flavor recipe.

IMG_6880

Ingredients:

  • Chicken – 500gms, cut and washed
  • Big onions – 2, finely chopped
  • Big Tomatoes – 2, finely chopped
  • Coriander Leaves – 1 tsp, finely chopped
  • Ginger and garlic paste – 2 tsp
  • Ginger -1 tsp, long chopped
  • Green chili – 3 nos, finely chopped
  • Whole black pepper – 1 tsp
  • Cumin seeds – 2 tsp
  • Fennel seeds / Saunf – 2 tsp
  • Cinnamon stick – 1 piece
  • Cloves – 4 nos
  • Cardamom – 2 nos
  • Red Chili powder – 1 tsp
  • Coriander Cumin Powder – 1 tsp
  • Turmeric powder – 1 tsp
  • Salt – to taste

IMG_6878

Method:

  1. Heat oil in a cooking pot. Add Black pepper, cumin seeds, fennel seeds, cinnamon, cloves and cardamom. Saute for a few seconds.
  2. Add onions and saute till transparent. Add ginger garlic paste and saute till onions turn golden.
  3. Add tomato, green chilies and ginger. Saute for 4-5 minutes. Add salt, red chili powder, turmeric and coriander cumin powder. Mix them all well.
  4. Add chicken and cook on slow gas for 10-15 minutes or till the oil separates.
  5. Garnish the gravy with coriander leaves.

Serve it with Biryani, pulao, parantha, dosa or just with chapatti. Works in lot of ways!

Click the respective link to check out our recipes for Biryani, Vegetable Pulao and Aalo Parantha. And remember to  follow us at Facebook, Twitter and Pinterest.

Cheers!

Chivda / Thin Poha Chivda / Poha Namkeen

Poha Chivda is a famous namkeen / farsaan in Gujarat. It is again of two types viz thick and thin poha. Namkeen can be made of both the types of poha. The only difference is, thick poha namkeen is deep fried mixed with variety of dry fruits. Thin poha namkeen is roasted mixed with nuts and dry fruits. This namkeen can be stored for almost a month in an air tight container.

You may like other gujarati recipes here

Image

.

Ingredients:

  • Thin Poha – ½ kg
  • Ground nuts / sing dana / mungfali dana – ½ cup
  • Dried coconut slices – ½ cup
  • Cashews – 1/3 cup (slit to half)
  • Raisins – 1/3 cup
  • Green Chillies – 8 nos. (cut into long slits)
  • Sugar – 1 tsp
  • Mustard deeds / Raii – ½ tsp
  • Salt – to taste
  • Turmeric Powder – ½ tsp
  • Chaat Masala – ½ tsp
  • Black Salt – ½ tsp
  • Lemon Juice – 2 lemons
  • Oil – ½ cup

Image

Method:

  1. Dry roast poha in microwave for 1 min.
  2. Heat oil in a heavy bottom wok and fry ground nuts, cashew nuts, dry coconut slices, green chillies , and raisins separately.
  3. Fry each variety separately until done and add to the roasted poha.
  4. Deep fry the raisins until they just bulge, else they will become tough.
  5. Deep fry the green chillies until they are crisp and maintain their green color.
  6. In the same oil, then add mustard seeds. Allow them to crackle. Close the flame and then add sugar, salt, black salt, chaat masala, turmeric powder and lemon juice. Mix well and add to the roasted poha.
  7. Mix thoroughly. Adjust the seasoning, if required.
  8. Allow it to cool at room temperature and then store in an air tight container.

Image

If you like our recipe leave a comment below. We would like to know your experiences as well. Or you can  follow us at Facebook, Twitter and Pinterest.


Hyderabadi Kacha Gosht Biryani

Chicken Biryani! Yes you’ve read it right. Just the word brings so much joy to us; imagine having it at the comforts of our houses. It one of the most preferred recipes in our house for Sunday lunch. Sunday you have ample time to dedicate to this pampered, fragrant rice delicacy.

There are two ways of cooking biryani; uncooked chicken and cooked chicken. Cooked chicken biryani needs chicken and rice to be cooked separately and later combined. Today’s recipe is typical hyderabadi kacha gosht biryani, where marinated raw chicken and half cooked rice are layered and cooked in a dum style on a low flame.

It is a time consuming recipe, but the results are so good that spending so much time for preparation doesn’t bother.  🙂

IMG_6871

Ingredients:

  • Chicken – 1kg, Washed
  • Onion – 2 big, finely sliced
  • Milk – ½ cup
  • Saffron – 1 tsp
  • Salt – to taste
  • Ghee – 2 tsp
  • Black Elaichi/Cardamom – 3 nos
  • Elaichi/Cardamom – 10 nos
  • Cinnamon – 1 stick, broken into two pieces
  • Bay leaves – 4 nos
  • Cloves – 7 nos
  • Shah Jeera / Cummin – 1 tsp
  • Black Pepper powder – 1 tsp

 Marinade:

  • Thick Curd – 1 cup
  • Ginger Garlic Paste – 4tsp
  • Tomatoes -2
  • Salt – to taste
  • Red Chili Powder – 1 tsp
  • Turmeric Powder – 1/4 tsp
  • Coriander Cumin Powder (Dhaniya Jeera) – 1 tsp
  • Biryani Masala – 1 tsp
  • Ghee – 2 tsp

 To cook Rice:

  • Basmati Rice – 4 cups
  • Salt – to taste
  • Coriander Cumin Powder (Dhaniya Jeera) – 1 tsp
  • Oil – 2 tsp
  • Water- as required

IMG_6874

Method:

  1. In a pan, add oil and toss in Black Elaichi/Cardamom, Elaichi/Cardamom, Cinnamon, Bay Leaves, Cloves, Shah Jeera, black pepper and salt. Stir fry, and then add onions. Fry the onions till they get golden brown in color. Make sure that it doesn’t burn. Use half for chicken marination and save the other half for garnishing.
  2. Cut properly washed chicken into pieces. Take a big glass dish or bowl, add chopped chicken, curd, ginger garlic paste, tomatoes, golden brown onion, biryani masala, salt, red chili powder, turmeric powder, coriander cumin powder and ghee. Mix them all well. Cover and keep aside the chicken for one hour to marinate.
  3. Take a cooking pot. Add water, salt, Coriander Cumin Powder and oil. Let it boil. Once boiled, add rice. Cook the rice till it is 70% cooked. Sieve the rice and keep aside.
  4. Add saffron to luke warm milk and mix together. Keep aside.
  5. Take a handi/ deep cooking pot. Start with the marinated chicken as first layer. Spread the chicken equally on the base, so that it gets cooked equally.
  6. Then spread the half of cooked rice equally as the second layer. Pour a tsp of ghee, some golden brown onions, half of the saffron milk mixture. Now spread the rest of the rice as next and last layer. Pour remaining ghee, golden brown onions and saffron milk mixture.
  7. Take wheat dough and roll it into a long rope. Roll it around the edges of your cooking pot. Place a lid and seal the pot (as shown in the picture below). Place a heavy weight on the lid so that it seals properly.

IMG_6868

         8. Follow this process if you have proper handi as shown in the above pic: Cook biryani for 2 mins on high flame, then lower the flame and cook for 30 mins on low flame. Else, follow this                         process: Cook Biryani on high flame for 2 mins. Remove the pot from the stove and place an iron tawa. Allow to heat. Reduce to low flame and place back the biryani pot on the iron tawa and      cook biryani for 30 mins. Turn off heat and remove the pot from the tawa.

Biryani is ready. Serve it hot with Raita and chicken gravy of your choice. In my next post I will be writing the recipe of the gravy I made with this biryani.

If you like our recipe leave a comment below. We would like to know your experiences as well. Or you can  follow us at Facebook, Twitter and Pinterest.